How to Disassemble Your Ruger Mark IV 22/45 Bolt: A Step-by-Step Guide
Disassembling your Ruger Mark IV 22/45 bolt is a crucial skill for any owner, whether you’re a seasoned marksman or a new enthusiast. Proper cleaning and maintenance are essential for ensuring the longevity, reliability, and accuracy of your firearm. This comprehensive guide provides a detailed, step-by-step walkthrough on how to disassemble your Ruger Mark IV 22/45 bolt safely and effectively. We’ll cover everything from the necessary tools to detailed explanations of each step, ensuring you can confidently perform this task. This guide goes beyond the basics, offering expert tips and insights gained from years of experience with this popular pistol. By the end of this article, you’ll have the knowledge and confidence to disassemble, clean, and reassemble your Ruger Mark IV 22/45 bolt like a pro, ensuring optimal performance and preventing potential issues down the line.
Understanding the Ruger Mark IV 22/45 Bolt
The Ruger Mark IV 22/45 is a semi-automatic pistol renowned for its accuracy, reliability, and ease of use. A key component of this firearm is the bolt assembly, which plays a vital role in the cycling of rounds and the overall functioning of the pistol. Understanding the intricacies of the bolt is essential for proper maintenance and troubleshooting.
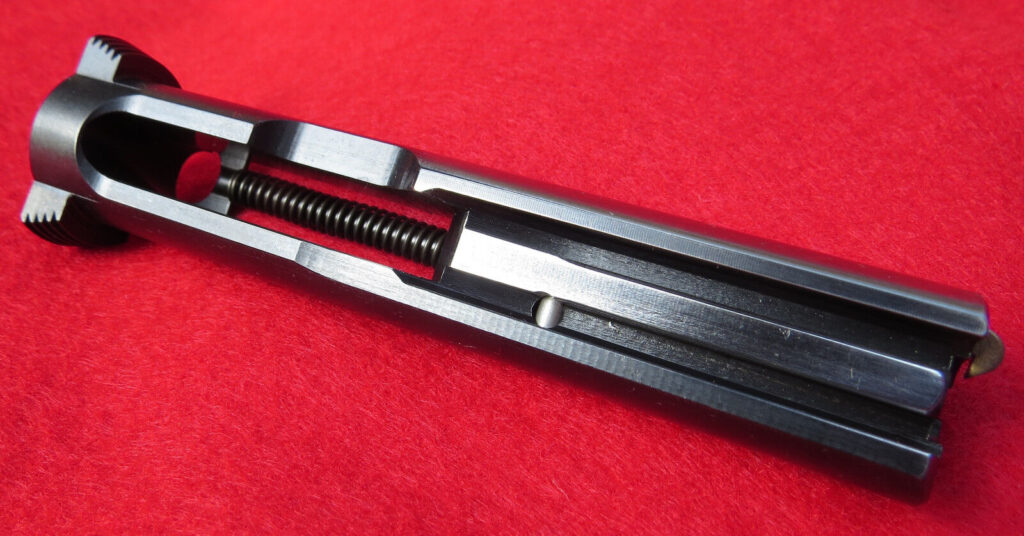
The bolt, in essence, is the heart of the Ruger Mark IV 22/45’s semi-automatic action. It’s the component that strips a fresh round from the magazine, chambers it, and then extracts and ejects the spent casing after firing. It also houses the firing pin and other crucial parts. The 22/45 designation indicates that the pistol’s grip frame is angled similarly to a 1911 .45 caliber pistol, providing a familiar feel for many shooters. The bolt design is relatively simple, but precision is key for proper operation. Disassembling the bolt allows you to thoroughly clean out any accumulated carbon fouling, lead deposits, and other debris that can hinder its performance.
Regular cleaning of the bolt is paramount. Over time, unburnt powder residue, lead shavings from the .22LR ammunition, and general grime can accumulate within the bolt assembly. This buildup can lead to malfunctions, such as failures to extract, failures to eject, and even light strikes on the cartridge rim, resulting in misfires. By keeping the bolt clean, you ensure smooth and reliable operation of your Ruger Mark IV 22/45.
Moreover, understanding the bolt’s components helps in diagnosing potential issues. If you experience problems with your pistol, knowing how the bolt works and being able to disassemble it allows you to inspect the individual parts for wear, damage, or breakage. This can save you time and money by allowing you to identify and address the problem yourself, rather than relying solely on a gunsmith.
Essential Tools for Disassembling the Ruger Mark IV 22/45 Bolt
Before you begin the disassembly process, it’s crucial to gather the necessary tools. Having the right tools on hand will make the task easier, safer, and more efficient. Here’s a list of essential tools you’ll need:
* **Soft-faced Hammer or Mallet:** A soft-faced hammer or mallet is used to gently tap pins and components without damaging them. Avoid using a steel hammer, as it can easily mar the finish or deform the parts.
* **Pin Punch Set:** A pin punch set is essential for safely and accurately removing pins from the bolt assembly. Choose a set with various sizes to accommodate different pin diameters. A set of brass or nylon punches is preferred to prevent scratching the finish.
* **Small Screwdriver Set:** A small screwdriver set with both flathead and Phillips head screwdrivers is necessary for removing screws and adjusting components. Ensure the screwdrivers fit the screw heads properly to avoid stripping them.
* **Cleaning Solvent:** A quality gun cleaning solvent is essential for removing carbon fouling, lead deposits, and other grime from the bolt components. Choose a solvent specifically designed for firearms and follow the manufacturer’s instructions.
* **Cleaning Brushes:** A set of cleaning brushes with nylon or bronze bristles is needed to scrub away stubborn deposits from the bolt components. Use different sized brushes to reach into tight spaces.
* **Cleaning Patches:** Cleaning patches are used to wipe away solvent and debris from the bolt components. Use lint-free patches to avoid leaving behind residue.
* **Gun Oil or Lubricant:** After cleaning, it’s essential to lubricate the bolt components with a quality gun oil or lubricant. This will help prevent corrosion and ensure smooth operation.
* **Protective Eyewear:** Always wear protective eyewear when disassembling and cleaning firearms to protect your eyes from flying debris or solvent splashes.
* **Work Surface:** A clean and well-lit work surface is essential for organizing your tools and components. A gun cleaning mat is ideal for protecting your work surface and preventing small parts from rolling away.
Having these tools readily available will make the disassembly and cleaning process much smoother and more enjoyable. It also demonstrates respect for the firearm and ensures you are handling it with the proper care.
Step-by-Step Guide to Disassembling the Ruger Mark IV 22/45 Bolt
Now that you have gathered the necessary tools, let’s proceed with the step-by-step disassembly process. Follow these instructions carefully to ensure a safe and successful disassembly.
**Step 1: Ensure the Firearm is Unloaded**
Before you begin any disassembly, it’s absolutely crucial to ensure that the firearm is unloaded. Remove the magazine and visually inspect the chamber to confirm that it is empty. Double-check to be absolutely certain that there is no ammunition present. This is the most important safety step.
**Step 2: Remove the Bolt from the Pistol**
Refer to your Ruger Mark IV 22/45 owner’s manual for instructions on how to remove the bolt from the pistol. Typically, this involves field stripping the pistol and then removing the bolt assembly from the receiver.
**Step 3: Locate the Firing Pin Retaining Pin**
The firing pin retaining pin is a small pin located on the rear of the bolt. This pin holds the firing pin in place. Carefully examine the rear of the bolt to identify this pin.
**Step 4: Remove the Firing Pin Retaining Pin**
Using a pin punch that is slightly smaller than the diameter of the firing pin retaining pin, gently tap the pin out of the bolt. Support the bolt on a solid surface and use a soft-faced hammer or mallet to tap the punch. Be careful not to damage the bolt or the pin. Store the pin in a safe place.
**Step 5: Remove the Firing Pin**
Once the firing pin retaining pin is removed, the firing pin should slide freely out of the rear of the bolt. If it doesn’t, gently tap the bolt on a soft surface to dislodge the firing pin. Be careful not to lose the firing pin spring, which is a small spring located behind the firing pin.
**Step 6: Locate the Extractor Plunger and Extractor**
The extractor is a small claw-like component located on the side of the bolt. The extractor plunger is a small spring-loaded plunger that holds the extractor in place. Locate these components on the bolt.
**Step 7: Remove the Extractor Plunger**
Using a small punch or a pointed tool, carefully depress the extractor plunger and slide the extractor forward and out of the bolt. Be careful not to lose the extractor plunger spring, which is a small spring located behind the plunger.
**Step 8: Remove the Extractor**
Once the extractor plunger is removed, the extractor should slide freely out of the bolt. Store the extractor and the extractor plunger spring in a safe place.
**Step 9: Inspect All Components**
Once you have disassembled the bolt, carefully inspect all of the components for wear, damage, or breakage. Pay close attention to the firing pin, extractor, and springs. Replace any worn or damaged parts.
Cleaning the Ruger Mark IV 22/45 Bolt Components
After disassembling the Ruger Mark IV 22/45 bolt, thorough cleaning is essential to remove accumulated carbon fouling, lead deposits, and other debris. This process ensures the pistol’s reliable operation and longevity. Here’s a detailed guide to cleaning each component:
**1. Safety First:**
* Always wear protective eyewear and gloves when handling cleaning solvents.
* Work in a well-ventilated area to avoid inhaling fumes.
* Keep cleaning solvents away from open flames and heat sources.
**2. Cleaning the Bolt Body:**
* Apply a generous amount of gun cleaning solvent to the bolt body.
* Use a nylon brush to scrub away carbon fouling and lead deposits, paying particular attention to the bolt face and the areas around the firing pin hole and extractor channel.
* For stubborn deposits, allow the solvent to soak for several minutes before scrubbing again.
* Wipe the bolt body clean with lint-free cleaning patches until all traces of solvent and debris are removed.
**3. Cleaning the Firing Pin:**
* Apply gun cleaning solvent to the firing pin.
* Use a small brush to clean the firing pin, paying particular attention to the tip.
* Inspect the firing pin for any signs of damage, such as bending or cracking.
* Wipe the firing pin clean with a lint-free cleaning patch.
**4. Cleaning the Extractor:**
* Apply gun cleaning solvent to the extractor.
* Use a small brush to clean the extractor, paying particular attention to the claw.
* Inspect the extractor for any signs of damage, such as chipping or rounding.
* Wipe the extractor clean with a lint-free cleaning patch.
**5. Cleaning the Springs:**
* Apply gun cleaning solvent to the firing pin spring and the extractor plunger spring.
* Use a lint-free cleaning patch to wipe the springs clean.
* Inspect the springs for any signs of damage, such as bending or compression.
**6. Final Inspection:**
* After cleaning all of the components, carefully inspect them again to ensure that all traces of solvent and debris have been removed.
* If necessary, repeat the cleaning process.
**7. Lubrication:**
* Apply a light coat of gun oil or lubricant to all of the bolt components, including the bolt body, firing pin, extractor, and springs.
* Use a lint-free cleaning patch to wipe away any excess lubricant.
By following these steps, you can ensure that your Ruger Mark IV 22/45 bolt is thoroughly cleaned and properly lubricated, which will help to maintain its reliability and accuracy.
Reassembling the Ruger Mark IV 22/45 Bolt
Once you have thoroughly cleaned all of the components of the Ruger Mark IV 22/45 bolt, it’s time to reassemble it. Follow these steps carefully to ensure proper reassembly:
**Step 1: Install the Extractor**
* Insert the extractor into its slot in the bolt.
* Depress the extractor plunger and slide the extractor into place until the plunger snaps into its detent.
**Step 2: Install the Firing Pin**
* Insert the firing pin into the rear of the bolt, making sure that the firing pin spring is properly seated behind it.
**Step 3: Install the Firing Pin Retaining Pin**
* Align the firing pin retaining pin hole in the bolt with the firing pin.
* Using a pin punch, gently tap the firing pin retaining pin into place until it is flush with the surface of the bolt.
**Step 4: Test the Bolt Function**
* Once the bolt is reassembled, test its function by manually cycling the action of the pistol.
* Ensure that the firing pin moves freely and that the extractor properly engages and ejects spent casings.
Troubleshooting Common Issues
Even with careful disassembly and reassembly, you might encounter some common issues. Here’s a guide to troubleshooting them:
* **Failure to Extract:** This could be due to a dirty or damaged extractor. Ensure the extractor is clean and the spring has proper tension. If the extractor claw is worn, it needs replacement.
* **Failure to Eject:** Similar to extraction issues, this could stem from a dirty extractor or ejector. Check the ejector on the pistol’s frame as well. A weak extractor spring can also cause this.
* **Light Strikes/Misfires:** A dirty or damaged firing pin is often the culprit. Clean the firing pin channel thoroughly. Inspect the firing pin tip for damage; replace if necessary. Also, ensure the firing pin spring is not compressed or broken.
* **Difficulty Disassembling:** If pins are difficult to remove, ensure you’re using the correct size punch. Apply a penetrating oil and let it sit for a few minutes before attempting again. Never force anything.
* **Difficulty Reassembling:** Ensure all parts are properly aligned. Refer back to the disassembly steps. A small amount of lubrication can help with reassembly, but avoid over-lubricating.
The Importance of Regular Maintenance
Regular maintenance of your Ruger Mark IV 22/45 is crucial for its longevity and reliable performance. By disassembling, cleaning, and lubricating the bolt regularly, you can prevent malfunctions, maintain accuracy, and extend the life of your firearm. It’s recommended to clean the bolt after every few hundred rounds, or more frequently if you notice any signs of malfunctions.
Expert Tips for Maintaining Your Ruger Mark IV 22/45
Here are some expert tips to help you keep your Ruger Mark IV 22/45 in top condition:
* **Use Quality Ammunition:** Using high-quality ammunition will help to reduce fouling and improve reliability.
* **Lubricate Properly:** Proper lubrication is essential for smooth operation. Use a quality gun oil or lubricant and apply it sparingly to all moving parts.
* **Inspect Regularly:** Regularly inspect your pistol for any signs of wear, damage, or corrosion. Address any issues promptly to prevent them from escalating.
* **Store Properly:** Store your pistol in a safe and dry place to prevent corrosion and damage.
Q&A Section: Common Questions About Ruger Mark IV 22/45 Bolt Disassembly
**Q1: How often should I disassemble and clean my Ruger Mark IV 22/45 bolt?**
*A1:* We recommend disassembling and cleaning the bolt every 500 rounds, or more frequently if you notice any malfunctions or excessive fouling.
**Q2: What type of solvent should I use to clean the bolt?**
*A2:* Use a solvent specifically designed for firearms. These solvents are formulated to dissolve carbon fouling, lead deposits, and other grime without damaging the metal or finish of the bolt.
**Q3: Can I use a steel hammer to remove the pins?**
*A3:* No, avoid using a steel hammer, as it can damage the bolt or the pins. Use a soft-faced hammer or mallet instead.
**Q4: What should I do if a pin is stuck?**
*A4:* If a pin is stuck, apply a penetrating oil and let it sit for a few minutes before attempting to remove the pin. Use a pin punch that is slightly smaller than the diameter of the pin and gently tap it out.
**Q5: How much lubricant should I apply to the bolt components?**
*A5:* Apply a light coat of lubricant to all of the bolt components. Avoid over-lubricating, as this can attract dirt and grime.
**Q6: What are the signs of a worn-out firing pin?**
*A6:* Signs of a worn-out firing pin include light strikes, misfires, and a flattened or chipped firing pin tip. If you notice any of these signs, replace the firing pin immediately.
**Q7: How do I know if my extractor spring is weak?**
*A7:* A weak extractor spring can cause failures to extract or eject. If you notice these issues, replace the extractor spring.
**Q8: What should I do if I lose a small part during disassembly?**
*A8:* If you lose a small part during disassembly, contact Ruger or a reputable gun parts supplier to obtain a replacement part.
**Q9: Can I use a parts cleaner, like brake cleaner, to clean the bolt?**
*A9:* While some people use brake cleaner, it’s generally not recommended. Many parts cleaners can be harsh on the firearm’s finish and could potentially damage rubber o-rings or other components. Stick to dedicated gun cleaning solvents.
**Q10: What is the best way to store my Ruger Mark IV 22/45 when it is not in use?**
*A10:* Store your pistol in a safe and dry place, away from children and unauthorized individuals. Consider using a gun safe or lockbox. Before storing, ensure the firearm is unloaded and lightly lubricated to prevent corrosion.
Conclusion
Disassembling, cleaning, and reassembling your Ruger Mark IV 22/45 bolt is a straightforward process that is crucial for maintaining the performance and reliability of your pistol. By following the steps outlined in this guide and using the proper tools, you can confidently perform this task yourself. Remember to always prioritize safety and refer to your owner’s manual for specific instructions. Regular maintenance will ensure that your Ruger Mark IV 22/45 continues to provide you with years of shooting enjoyment. Share your experiences with disassembling and cleaning your Ruger Mark IV 22/45 bolt in the comments below. If you’re ready to take your knowledge further, explore our advanced guide to maintaining your Ruger Mark IV 22/45’s trigger mechanism. For personalized assistance or advice, contact our team of firearm experts today.
